
Skills (DIY) / 2014-01-06
Painting Your Motorcycle
This article was originally written in Turkish and translated with the help of artificial intelligence.
drz400urbancamo.jpg
Now that the training schedule had slowed down, I decided to paint the rather scruffy DRZ to smarten it up and make it a little more personal. There are simpler, cheaper ways, of course. A new plastics kit or decal set would do almost the same job. The difference is that this is a little more personal, and I think doing it myself will strengthen the bond between us. Let me warn you right away: painting a dirt bike may turn out not to be a good idea. It can get scratched, and the paint may even peel in places. Consumables may cost more than replacing the parts. Frankly, I am not particularly concerned about cost on this project. If I do not like it, I can still go and buy a new plastics kit.
As a first step, I removed the parts to clean them.
img2096cg.jpg
I found a new use for the Jacuzzi. Before this, I had tried to get as much mud as possible off them outside on the balcony.
img2097sz.jpg
This project will never end... :P
Today was spent preparing for paint. Trees, creepy-crawlies and everything else had left the plastics badly scratched. It was a demanding, tiring day. My out-of-practice hands and fingers certainly played a part in that.
I started with repairs. Two parts had breaks and cracks. Unfortunately, this kind of plastic is formulated to resist chemical reactions, which makes gluing it difficult, so I used an epoxy-based adhesive for my first attempt.
This part had already undergone an unsuccessful repair:
img2099uq.jpg
Below is the other broken part:
img2104vk.jpg
The most important thing to remember when using filler is that the more you apply, the more sanding you will have to do.
img2100cv.jpg
After sanding the previous part, filler remains only in the scratches. I started with 100-grit, followed by 120, 180, 220 and finally 360-grit paper.
img2101w.jpg
It looks dirty, but I have actually achieved an almost smooth surface. I expect there will be some more sanding to do after a guide coat of primer. I will keep going finer, aiming to reach 440 or 500 grit before the paint coat.
img2098l.jpg
That is enough for today. I am tired. I also need daylight for the fine work. Let's see what tomorrow brings.
I applied a guide coat of primer:
img2105h.jpg
I will not be able to be as lazy as I had hoped; there are a few spots I missed on almost every part:
img2106j.jpg
Tomorrow these spots will get filler and sanding, followed by another coat of primer...
I have prepared the paints; there is no turning back now. Though if I manage it, I can always paint it again from time to time.
Repairs and filler on the tail are finished, ready for checking:
img2112tp.jpg
The radiator shrouds after repairs, checking and sanding:
img2111li.jpg
The decal adhesive had eaten into the plastic. When primer failed to cover it, I went back to filler:
img2114av.jpg
Here it is half sanded. More filler means more sanding. I am tired...
If the weather allows, I hope to finish priming tomorrow.
img2117qtq.jpg
An example of the filler dust produced by each session. I have finally got rid of the traces of the Suzuki engravings (!). :)
img2118l.jpg
As I am gradually approaching the clean painting stage and do not have a proper paint shop, I decided to build a little room to keep out dust and direct sunlight and also act as something of a drying oven. I hope it will let me work on the terrace. I will use the wooden strips at home and whatever other materials I can find.
img2119l.jpg
After a short break, I am picking up where I left off.
I have finished the paint booth. It is makeshift, but it will do the job:
img2120pj.jpg
It has a lid too:
img2122p.jpg
It is time for primer, but not today. The main purpose of the paint booth is protection from dust. The materials I use dry faster as the temperature rises, up to a point. The booth helps with that too.
More filler and sanding on some parts:
img2165ql.jpg
Hey, we forgot the tank!
img2170db.jpg
It was full to the brim too; not all the fuel would fit in the jerrycan. The tank had been painted before. Its colour was already more of a chick-yellow. Underneath I found a coat of primer, a coat of filler, then another yellow, more filler and so on. I think I will strip it completely; the more I scrape, the more comes off.
All this scraping will later cost me a new tank. I do not know that yet and am sanding away enthusiastically. My advice is not to mess too much with the tank's seams. Repair was possible, but I could not be bothered; I wanted a plastic tank anyway. Today my DRZ has an Acerbis plastic tank. :)
img2171cc.jpg
The remaining parts are now ready for paint.
img2173b.jpg
These are my little beauties:
img2175a.jpg
Sanding the tank gave me a lot of trouble. Finally I primed it:
img2242p.jpg
I have made a serious mistake! My primer and base colour are very similar. I struggle to see the paint I am applying over the primer. My advice is to change the primer's colour with a suitable paint, or get a primer that differs from your base coat. You can see the primer on the upper part and the base colour on the lower one:
img2243c.jpg
In the end, I applied the first coat of paint to every part. From here on it should be relatively quick, unless I make a mistake:
img2244ral.jpg
I plan to finish the base-colour coats today. Off to work. :)
I worked hard today. I finished the base colour and started the camouflage. I moved away from my chosen theme to give it a little more of an airbrushed feel, but am still using the same colours.
I made the camouflage patches a little more playful:
img2246e.jpg
The front mudguard is ready for the third colour:
img2247tl.jpg
You may have noticed the mask. I decided against decals and will paint those too.
Let's see what tomorrow brings. :)
img2253wb.jpg
img2255b.jpg
img2258n.jpg
Hmm, I think it will be ready in time. I have applied the first coat of clear:
img2266jc.jpg
They are not fully dry yet. I plan to apply the second coat late this afternoon:
img2267f.jpg
Assembly will have to wait until tonight at best, perhaps tomorrow morning.

I had a little (!) accident. As I moved the table, the jar of dirty thinners I use for cleaning brushes and spray guns, which I had left on the edge, spilled over the parts. I stood there shouting and braying with rage for a while, actually until my voice gave out. I repainted two of the damaged parts from scratch and repaired the other two. In the picture below, the part with the DRZ logo is repaired; the other was repainted from scratch. If I can apply and dry the clear coat tomorrow, it will be time to assemble it. :)
This time I added my lucky clover too. :)
I lined the inside of the part covering the exhaust with a material I hope will insulate it from the heat:
yalit2.jpg
Assembly is finished too. :)
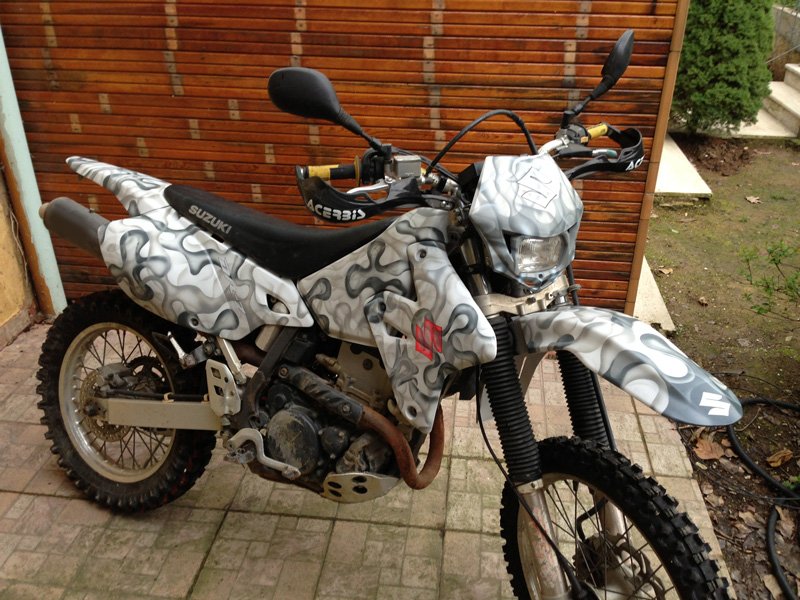
This project ends here. Thank you for your patience and your confidence-building messages. The fork legs are next, but let me ride it a little first. :P